Wednesday, 24 July 2013

Paris in Pink

Hello!

Well I'm back to my old favourites now with a pretty little project for you!

Yesterday we went into Mansfield (yep, we took a trip out in the thunder and lightning - there were hardly any people about so it was great!) and there's a shop that we LOVE to visit, just because it has really cute alterable products.

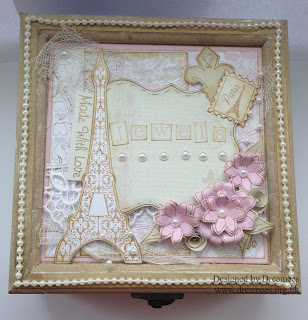
This is a Jewelry box that I picked up for £3.99 and it originally had a photo-frame aperture in the top (heart shaped) - I've covered it over with some special Paris papers that I've designed (these will be available with the new stamp releases sometime this week!) and then I've treated the top frame like a card front.


I've used our BRAND NEW upcoming stamp sets for this box - this includes the following:

Perfume stamp set (5 stamps!!) - £3.00


Paris (4 stamps - original size of the Eiffel Tower is 12cm tall!) - £3.50


Flower Shapes (Set 2) - £3.00 (I've used this for leaves!)


Flower Shapes (Set 3) - £3.00


The only ink pad colour I've used is Gathered Twigs and then I've used some gorgeous ribbons, pearls & what-not from our online store!


Here are a few more pictures for you:


There's plenty of glitter on the Eiffel Tower (which is damask patterned!!!), dotted on the flower petals & leaves, on the postage stamp and the Fleur-De-Lis (which makes a gorgeous backing paper by the way!).

The Made With Love sentiment comes with some shell-shaped patchwork stamps that will be released soon too:


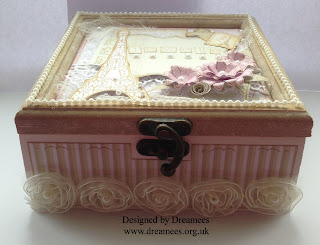
Finally, here are the outside edges & the inside of the box - I've just used some of the Paris papers I have designed (releasing along with the stamps) and then I've just cut out the Fleur-De-Lis & Postage Stamp with an edge then distressed with Gathered Twigs.


I'm SO pleased with the results here & I hope you like it too!


Tuesday, 9 July 2013

Berry Wreath Cards

Hello!

I just wanted to share a couple of Berry Wreath cards (by request!) and surprisingly, when I promised to post some, I realised we didn't have many at all.

Here are the only other 2 (alongside the original 1) that we have made with the Berry Wreath - these will be on our display wall at Summer Crafting next weekend (13th/14th of July - at Doncaster Racecourse - tickets are still available for £5.00!)

First off, this is my ultimate favourite colour - I LOVE anything Purple and especially this deep purple I've used here.


On this card I've used backing papers from Christmas Essentials, some normal black card, some Die-cut snowflakes from our CraftROBO/Silhouette CD Cuttables 2 which I've coloured with a Black promarker, some of the gorgeous Purple Crispy lace ribbon (only 50p per metre!!!), a strip of teardrop lace that I found and didn't realize I had, a doily, lots of flowers, pearls and a touch of glitter!


And this card was sort of by accident - I'm going through a phase of being tired of using the same colours so I mixed it up a little here. Papers are from  Christmas Essentials again, more snowflake die-cuts, some baubles from the accessories section of Christmas Essentials and I added some glitter to the paper flowers too! Oh and there's a doily peeping out from under the topper too!


Hope you like these cards & I'll see you soon!

Hayley xx

Thursday, 4 July 2013

Christmas scene!

Hello!
Here I am again with another Christmas post (Sorry, I know we're only just getting used to 20 degree heat and a little bit of sunshine!) - I've been making a winter scene in a frame today, though I've just got around to finishing it off!

Sorry for the poor lighting, my camera's not great in the evening so this is instagrammed.

I've used papers from the Christmas Essentials CD which is just £5 and the Bare Trees stamp set which is £3.

I printed out some navy blue plain backing paper and distressed the edges with Faded Jeans distress ink, placed the square inside my frame (which is taken from the Templates & More CD). I added dots in the corner of the aperture so that my stamped trees would be in clear view.

I took out the square of navy paper and stamped the large and small tree side by side in clear Versamark and embossed with WOW! powder (Silver).

I then ripped two 'hills' out of paper, edged them with cool gray 1 pro-marker (along the ripped edge) and added glitter. These were then overlapped, just below the trees to give the effect that the trees are surrounded by snowy hills!

I used the snowflake from the Berry Wreath stamp set to decorate the edges of the navy paper, stamping it in Faded Jeans and adding a silver gem in the centre of each snowflake (close up below - sorry for the poor picture again!)

I added rock candy glitter to the branches on the trees and a little bit of glamour dust dotted in the sky for stars.

I secured the navy paper inside the frame and glued up the sides, adding strips of backing paper to the outside and to the top of the frame.

I've added some pearl trim similarly to garlands around the top and bottom of the frame, and used the flower set (1) shape (also available on the Christmas Essentials CD)  to make poinsettias in opposite corners.

I finally used the sentiment stamp (from Bare Trees stamp set) to make two flags in the lower corner.

Hope you like it!

Hayley xx

Tuesday, 2 July 2013

O Christmas Tree

Well the sun is out now and summer is here so of course in the craft world that means its time to start Christmas Crafting!! Christmas always starts in July and i LOVE Christmas it's my favourite time of year even all the preparation i just love it so naturally i love crafting for Christmas! I just LOVE all the new stamp releases and I just had a play with the new O Christmas Tree Set....
The papers are from the Christmas Essentials CD and i stamped the O Christmas Tree three times and decopaged the middle one to make it stand out. The sentiment also comes on the stamp set which is available for only £3. I used the edge of the tree stamp to do the edge.

You can find all the new releases on the Dreamees website :)

Thanks for stopping by :)
Kitty