Sunday, 23 December 2012

Love & Adore

Hello and Happy Christmas Eve Eve!!!
I hope you are all enjoying the start of the festive season. This is my first post for Dreamees and i am so excited to be part of the fabby team here. I have lots of ideas for you, i just need more hours in the day to get them all done. I do have a wedding card to show you that i created...
This card features the Bride & Groom Stamp which i coloured with my copics.
The papers i used are by Echo Park and i added some ribbon & rhinestones. 
Very simple but elegant i think - just how weddings should be :)

Hope you have enjoyed my first card and i will be back soon with more inspiration and ideas using Dreamees products.

Hope you all have a Happy Christmas :)

Kitty xx

Monday, 17 December 2012

Sweet Variety.....

Hello lovelies, Nicola here today with a 'Sweet Variety' of projects!

As Christmas is coming I knew I wouldn't have any time over the festive season to do any crafting so today I have made five projects for you all to see.

My first project to show you is using the SWEET SHOP STAMP I just knew what I wanted to make using this it was just perfect......

 
I had a packet of flying saucers so I thought I would use the stamp to decorate the bag with. I have coloured using Letraset Flexmarkers in shades of: Muted Pink ~ Tea Rose ~ Dusky Pink ~ Blush ~ Pale Pink ~ Pale Citrus ~ Meadow Green ~ Sunflower ~ Soft Aqua ~ Watermelon ~ Honeydew ~ Amaranth Red. I have used a heart border punch and embellished with Card Candi.
 
The next project I have used the MOSTLY MENS CD to make a birthday card for a wine lover. I am going to give this card to my brother-in-law for his birthday and he loves red wine so this is very fitting!
 
 
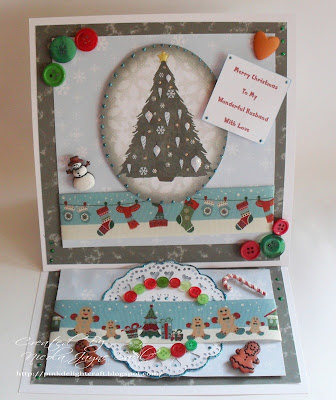
The next three projects I have made Christmas Cards using the CHRISTMAS MEMORIES CD I have made two general Christmas cards using more or less the same elements apart from the ribbons are different. I have also made my husband's Christmas Card. I had some ribbons that I wanted to use from my own stash so I matched the colour scheme to the ribbons. I have also used some buttons on the easel card too that I had in my crafty stash!


For the easel card I have used the Christmas tree topper and the text I have printed from my computer. I also added a PAPER DOILY WITH HEARTS  and decorated it with Stickles glitter glue.  I wanted to use the gingerbread and snowmen buttons that I had as they match the ribbons, papers and topper perfectly!

 
I hope you have enjoyed looking at my crafty projects today. Don't forget to click on the links to see where you can buy the gorgeous Dreamees products.
 
I hope you all have a lovely Christmas and a Very Happy New Year, don't forget to follow the Dreamees team in 2013 as there are lots of exciting times ahead!
 
Merry Christmas everyone,
lots of love
NJ XXX


Sunday, 2 December 2012

My New Design Team Position.....

Hello lovelies I am here today with a post introducing myself to all you dreamees fans! I have just joined the fabulous dreamees design team. If you don't know me already here is a little introduction...
 
My name is Nicola Jayne Saul but all my crafty friends know me as NJ. I have been crafting for around 8 years now. I absolutely love what I do with a passion and look forward to sharing with you all my crafty makes using the gorgeous dreamees products. Carol and Hayley asked me to join their design team and I was so excited to accept. Such a lovely team, I know that 2013 will be a fantastic year for us so make sure you keep following everything the dreamees team will be bringing to you.
 
I do work full-time and my day job is running my hair studio while working in it full-time too. I love my day job as much as I love my hobby of crafting. So, without further ado, here is my first design team project using dreamees products .....
 
Altered Photo Frame......


To make my Altered Photo Frame I have used ....
~ 6x4 photo frame
~ BRANCH STAMP click the links to be taken to the stamps
~ Ranger Alcohol Inks - Butterscotch ~ Caramel ~ Red Pepper ~ Gold Mixative
~ Blending tool and felt
~Memento Ink Pad Tuxedo Black
~ Letraset Promarkers - Crimson ~ Cardinal Red ~ Poppy ~ Berry red ~ Pear Green ~ Olive Green
~ Pigment Ink Pad Clear
~ Pearl Ex Pigment Powder Sunset Gold
~ Crafter's Companion Spray & Sparkle Gold
~ Pinflair Glue
~ Stickles Gold
To make....
~ Remove the back from the frame and glass. Lay the frame on your craft sheet. Add drops of each alcohol ink to the felt on the blending tool. Work in sweeping motions to add colour to the frame. Add your colour to your taste as you go along, this is a very random technique. I built my colour up gradually by letting it dry, then adding more.
~ Colour the chipboard backing, you would normally add a photo to this, but I have used it to create the picture.
~ Using the clear pigment ink pad stamp the branch in the centre.
~ Using a brush, dust the pearl ex powder over the image and gently sweep over this with a larger brush.
~ Sit the ink pad over the image and spray the gold spray around this to create a sparkly border. Add dots of gold stickles.
~ Stamp the Poinsettia 20 times, colour in. Cut out. Spray them all with gold spray and attach to the frame as shown using Pinflair.
~ To finish add the Stickles Gold to the centres of the Poinsettia.
 
I hope you like my first project for Dreamees. I think this makes a lovely Christmas Decoration with a difference.
 
Carol and Hayley have kindly donated some blog candy which you could be in with a chance of winning by following the steps on my blog
 
 
You have one week to enter for a chance to win some gorgeous dreamees goodies, so don't miss out!
I am looking forward to a very exciting 2013 working with Carol and Hayley, so keep following our crafty journey and our crafty makes!
 
Lots of love
to you all
NJ XXX

Monday, 19 November 2012

A Christmas Project

First off, my apologies for the poor photography - the project was too big for my little studio so I had to lie it on the floor! This has been made with a new Digistamp design of Santa Claus and a Vintage Christmas digital download paper pack.


The book is MDF (Surprise, surprise!) and all the dividers are MDF too - the book does come with 6 dividers and two end pieces though I've only decorated 4 out of the 8.


The Santa digi has been distressed with 'Gathered Twigs' (A new favourite I've found!), and small parts have been coloured with Tan and Cinnamon Pro markers.
The book has been bound with a fabric place mat from Wilkos,  and all embellishments are wooden snowflakes (Woodware) and Berry sprigs.
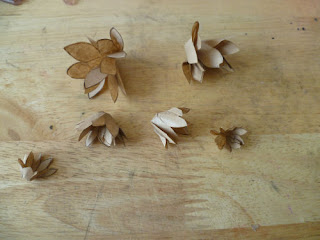
The flower selection have been made with our 'Large Flower (2)', 'Flower (2)' and 'Small Flower (2)' stamps - they're made by stamping out three and creating a sort of rose layering system with them. The first stamped flower you snip into it between two of the petals, out of the second you cut two petals, and the third four petals - throw away the two petals piece. Wrap each layer around and glue together, then layer inside each other.
I used cream and plain brown papers for these - alternating depending on size.


My first page, I covered in plain cream paper and attached a strip of patterned across the centre (I decided to do the same sort of thing per page as a base).
I then added lace and twine to embellish.
We took a trip to the Ross Papercraft Show at Don Valley stadium yesterday too so I grabbed some Cinnamon sticks (real and gorgeously smelling!) and some other little bits & bobs to add to the stash! I used twine to tie two sticks together and glued onto the lower left - the  'Large Flower (2)' stamp was used on spotty paper from Vintage Christmas digital download and embossed with gold WOW glitter embossing powder. I then added a paper flower in the centre.
I printed out the words 'My Christmas Book' and cut them up for across the middle.


The same sort of principles apply for the three dividers - I did the basic covering of the MDF and then a strip across in a coordinating paper - added either twine, ribbon or lace across the joins and then continued from there.
The same flowers were used throughout the making and some extra buttons, gems and pearls too.
The swirl and snowflake die-cuts are available online from Dreamees and can also be bought on our Cuttables CD range for the CraftROBO & Silhouette.

Hope you love this as much as I do!

I do have a couple more projects to blog soon though they've been made especially for two very lovely people so I can't write them up until I've actually given them out.

Watch this space :-)

Hayley xx

Tuesday, 13 November 2012

The NEC (Hobbycrafts!)

Well, well, well! I just got around to posting on the blog!

Here's a few pictures of how our stand looked at the NEC - right from the beginning up to the final stand we created! It was such a fabulous experience (once we got the hang of where we needed to be and got over the lack of sleep we were having!) and we're pleased to announce that we will definitely be on the same stand next year!!


Our stand had this as the centre piece (which will soon be featured in Simply Homemade, thanks to the lovely editor we met at the show! - we're also featuring 3 other projects in the same issue too!) and so many people complimented it, requesting pictures too! 


And here's us actually working... (in a fashion!)


Oh, and we can't forget meeting the lovely Nigel again, and Bev from over at Cupcake Crafting!


We hope you had a lovely day if you visited us and we can't wait to see you again - also, if you did pick up some Dreamees products be sure to email us over some pictures of your creations to: sales@dreamees.org.uk!

All the best,

Hayley

Sunday, 14 October 2012

A quick card - REALLY Quick!

Good Afternoon!
So today (well, for the first time in ages!) I thought I'd share a little tutorial with you. This is the second of the day and the first can be accessed HERE:
http://www.youtube.com/watch?v=tcco7UasE0o&feature=plcp

Now, all you're going to need for this is:
1 x Brown paper bag (we're using our bags - if you make a purchase with us at a show, you'll get one of these!)
Large Flower (2) Stamp
Flower (2) Stamp
Small Flower (2) Stamp
Christmas Background Stamp
Winter Wishes Stamp Set - Sentiment
Baubles Stamp Set - Sentiment
White Card
Pencil
Glue
Walnut Stain Ink Pad
Quickie Glue Pen
Glitter

1, Stamp TWO of each flower size onto your brown paper bag:


2. Cut these out:


3, Take a pencil and squash each flower over the end of it (NOT the pointy end) - they will screw up slightly as shown:


4, Layer these inside each other with glue:


5, Cut a piece of white card (any size rectangle) and stamp 'Christmas Wishes' round sentiment all over it:


6, Layer this onto brown paper, then again onto white card - cut a strip of brown paper and stamp the repetition stamp 'Christmas Background' all over it as shown:


This is attached across the centre of the card.

7, Stamp 'Warm Winter Wishes' onto brown paper and rip around the edges - attach this across the central border, towards the left of the card.

8, Add your flower to the right edge of the border as shown:


Here is our finished quick card:


Hope you like this!

This is what I was experimenting with yesterday in Birmingham - I find out the best materials to use when I'm reduced to simple necessities! This isn't our usual busy card as I set myself the challenge of doing simple & classy - I LOVE the colour of the paper bags.

Why not try it with candy-striped bags? or vintage flower patterned bags?

Have fun!

Hayley xx

Friday, 21 September 2012

A couple of new cards

I'm so sorry I'm slacking with the blog - here's a couple of cards we've made this week with our new stamp range!

You can view our new products HERE


See you soon!

Hayley x

Wednesday, 12 September 2012

A customer card!


Hello,

I just wanted to share a card with you made by a very talented customer of ours: Pauline Glover!

This card has been made using Dreamees papers, the 'Small Flower' stamp and 'Little Baby' stamp too!

I really hope you love it as much as we do!

Have a lovely day,

Hayley x

Saturday, 11 August 2012

A few new cards...

My apologies for not posting too often - but I do have a big update for you right now! It's been incredibly crazy here since we're getting ready for the BIG Donington show (Great British Craft Festival) so we've been throwing samples together left, right & centre. Here's a few for you:


At a later date I'll update everything with supplies used - though before I do, if you have any questions please don't hesitate to ask! Have a wonderful day, Hayley xx